February 28, 2013

DIY Spring Decor


We love Graphics, Photos, and Paper. 
With these 3 basics-- creativity is endless! 

Local Photographer and Entrepreneur, Jami Edman [aka, Images by Jami] uses our Graphics & Prints to decorate her home with photo tiles!  
Photo tiles are an unique way to display your photos and are so easy to make.
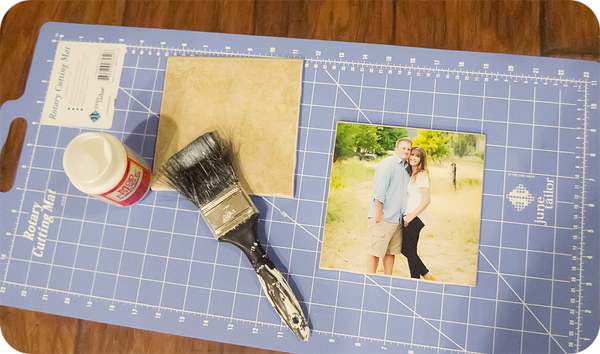
All you need is:
1. square tiles (6x6 and 12x12 are the easiest size to find at Home depot/Lowes)
2. square photographic print that is the same size as your tile. [photographic printing works best for this project. No ink = no bleeding colors!]
3. Mod podge
4. brush-sponge brush

 
1. Make sure tile is clean and dry
2. Make sure the square photographs will fit on your tile and do a slight trim if necessary
3. spread mod podge on the tile in a light layer
mod podge
4. Place photo on tile and let it dry for a few minutes
5. Add a light layer of mod podge over the print on the tile. Let it let dry.
6. Place tile on easels, plate holders, or on the wall and enjoy! Makes a great gift for mother's day or father's day. My sweet hubby is getting these for his birthday to decorate his office.


Persnickety Prints is offering a FREE DOWNLOAD of 6x6 and 8x8 graphics to help you get started!
Simply download the folder, select the graphic you'd like to use & then upload and order it at Persnickety Prints!
6x6 photographic prints > .79¢
8x8 photographic prints > .99¢
[US shipping $5 flat]
 -Jami

Visit my professional photography site at www.imagesbyjami.com, I am based in Utah but am doing travel Family sessions all over the U.S. this year and you can find my travel schedule on my website in the top menu. 

Looking for a great beginning photography course? Check out my free course! Usingmycamera.com teaches new camera owners how to use their Dslr cameras. Sign up for the self paced class that covers 6 hours of learning. This is a streaming program that can be paused & viewed again and again. Ask me questions right under each video section! We have special pricing for the new launch of www.usingmycamera.com that is only good until Monday March 4th.


More Persnickety Prints DIY Mod Podge Tutorials:

February 13, 2013

Made For Each Other - FREE kit + Hybrid Tutorial from The Lilypad

We're excited to bring you a FREE collab kit from The Lilypad!
Made For Each Other is the perfect kit for celebrating those you love. So, as our Valentine's gift to you, head over to TLP [the lily pad] and download! While you're there, you can take 20% off of the February BYOC with coupon code: MFEO, good through February 18th. This entire collection coordinates with the free collab, so you can easily put together an album or hybrid gift.
We also want to inspire you with a great tutorial, so keep reading and see the beautiful project that Cristina made with the kit!


***
Hi everyone! This is Cristina from the creative team at The Lilypad, and I want to show you how fun and easy it is to put together a hybrid mini album by printing out the awesome digital products from The Lilypad.

Valentine Day mini

For this mini album, I used the gorgeous kit Made for Each Other by The Lilypad designers, in addition to some products from the February BYOC. Each month, the designers at The Lilypad release products with the same color scheme, so that they all match and you can build your own collab (BYOC). :)

I designed my mini album in Photoshop. I decided to make an album with pages of 3"x4" in size, because I wanted something small and simple to put together. I designed 8 filler cards and 4 cards with photos - that gives me a total of 12 sides that result in 6 front and back pages. Here's how everything looked after printing, before I cut everything out. [ordering pre-designed 3x4 journaling cards from Persnickety Prints + archival photographic photos would be excellent as well!]

Valentine Day mini

I did most of my embellishing digitally, but I also printed out a few digital elements and cut them out with my Silhouette.

Valentine Day mini

After trimming all the cards with a pair of scissors, I spread out all the cards and decided in which order I wanted to put my pages together.

Valentine Day mini

I used liquid glue to adhere the backs of the cards together, and adhered the digital cut out elements with a glue pen or with foam dots for added dimension.

Valentine Day mini

The last step was to punch a 3/16" hole in the corner of the pages to bind them together with a ribbon.

Valentine Day mini

It really couldn't be easier to put this album together! Having all the pages of the same size makes it simple to put the album together, but you can still have fun adding the embellishments so that they stick out from the album - I love to see little bits peeking out from the side of an album. And here's what my album looks like (everything is from the Made for Each Other collab except otherwise noted).

Valentine Day mini
Word art from Sunshine, Blue Sky and Happy Days by Little Butterfly Wings

Valentine Day mini
Photo page: 3x4 Photo Templates by Designs by Lili

Valentine Day mini
Left page: 
Crazy for You papers by One Little Bird
Xoxo ephemera by Sahlin Studio

Valentine Day mini

Left page: 
Xoxo ephemera by Sahlin Studio
Right page:
3x4 Photo Templates by Designs by Lili
Dotted: Love Edition by Emily Merritt

Valentine Day mini

Left page: 
Crazy for You papers by One Little Bird
Xoxo ephemera by Sahlin Studio
Right page:
3x4 Photo Templates by Designs by Lili
I used the font included in the Made for Each Other collab to write the text on the arrow. The glitter hearts are added directly on the photo as an embellishment.


Valentine Day mini

Left page: 
Xoxo ephemera by Sahlin Studio
Right page:
3x4 Photo Templates by Designs by Lili


Valentine Day mini

I hope you enjoyed this tutorial! I would love to see what you create with this pretty kit, so post your projects in the gallery at The Lilypad!

February 7, 2013

Persnickety Prints Ordering Made Easy!


Online Ordering - our Dilemma

At Persnickety Prints, we print short run, on demand orders - all in house. We do not outsource. We hold our customers hand from start to finish. Because print quality and educating customers with ever advancing technology is so important to us, we must rely on a 3rd party company for the uploading and ordering process.
We spend countless hours working with Lifepics developers to improve the ordering platform. I, myself, drove to CES/PMA in Las Vegas last month in search of the "perfect" online photo ordering system for you, our Persnickety Prints customer. Some of you may be frustrated with our online photo ordering, be patient, we're doing our best to improve every aspect of your ordering experience.
1. We are trying to keep prices LOW. If we invest a million dollars in a custom ordering platform (think Shutterfly) which will have bumps... our print prices will go up significantly.
2. There are other platforms we can move to, but are they better for you? One will not host your images in a cart, nor online. Can you imagine adding photos to your cart, and risking the chance of them disappearing in the end, thus, having to upload all over again? This is a big issue for us. If this particular company changes their direction, they're an option.The other company uses Microsoft Silverlight plugins, and won't allow the user to choose different paper finishes at checkout. We don't enjoy installing plug-ins each time we access a site, and can't imagine you would either.
It seems that there has been some confusion in the Persnickety Prints online ordering process. The Express Print Order drop down works best when printing "one size fits all". For multiple print sizes & products, please select the "order with more options" link. 
To simplify, we've removed all Express print sizes, except our most popular:
12x12, 8.5x11, 8x8, 4x6 & 3x4 photographic prints.  

We still have over 100 different sizes & finish combinations to choose from, you'll find them all in an easier ordering structure when clicking "order with more options".
 
This process will allow you to quickly view the details of your cart, and easily edit or delete images. 
Below in grey, you will find your uploaded images with a drop down to make selections
Be sure to click the "add to cart" button.
  

We hope this quick ordering tutorial helps make life easier for you when placing orders with Persnickety Prints! We know that uploading images isn't the highlight of your day-- but keep in mind, we do offer free online full resolution storage! Once you've got those images in your account, they can be accessed anytime, anywhere- and downloaded back to your hard drive when needed.

More answers to FAQ can be found on our site.

Thank you!
Chari 

February 4, 2013

Insta Print

Instagram, Instalife, and now you've got Instaprint!

You have hundreds of memories filling up your smartphone. Now what?
We've got over 10 quick & easy ways to put your instagram images to use!

How many Project Lifers are in the house? Slap a piece of washi tape & instagram prints on your journaling cards & you've got yourself a memory worth keeping folks!

Persnickety Prints is always here to help! 7 ways to order your instagram prints [as low as .25¢ each] AND a chance to win your entire Instagram Feed!


To Enter: follow and repost this image OR your own image on Instagram with the hashtag #persnicketyprints
  • Enter once a day from now until Friday February 8th.
  • One random  THREE random winners will be chosen, posted & notified on Saturday February 9th. Prints will be shipped on Monday February 11th.
  • Up to 500 3x3 Instagram Prints will be printed on Persnickety Prints Premium Fine Art Paper & shipped to the winner.
  • Value at over $150
May the odds be in your favor! Good Luck!

>> CLOSED <<

We've got winners! [random drawing]
Thanks to everyone who participated! Stay tuned for our next IG Contest!