August 30, 2012

2013 CD Calendar


It's August, but never too soon to prepare for the Holidays!

Only 116 days until Christmas!

(yes, my stomach just hurt for a minute)
No worries, we've got you covered. Custom Calendars are the gifts that keep giving... all year long! Memories are Priceless. Persnickety Prints provides creative ways to share memories at a value that can't be beat.  Let's get started!

  • 2013 CD Calendar Template 
  • Free Download 
  • Free CD Case with Printing 
  • Total Cost: $9.75 (2 or more for $8.45) 


  • 12 Month  2013 CD Calendar Template (weeks start on Sunday) is sized to fit our jewel CD Cases
  • 2 CD covers to choose from
  • .png format (quick photoshop tutorial)
  • Step-by-step instructions are also included with all CD print orders


How to Order >>
1. upload the completed .jpg calendar pages.
2. choose order prints
3. select CD Calendar + Case


Merry Christmas!
Chari & the Persnickety Prints Team

August 29, 2012

[Weekly Mojo Series] Spotlight: Laura Kurz

Occasionally I like to feature scrapbookers and photographers in this space who have what I think of as an authentic perspective on memory-keeping and living with photographs. Laura Kurz is a scrapper whose outlook on scrapbooking and its role in her life (and the lives of her family members) really resonates with me. Laura's style bucks the trends and instead celebrates the beauty of a photo that -- although technically not perfect, perhaps -- embraces the perfection of each moment.
I asked Laura to share her thoughts on memorykeeping and photography with our readers. I hope you enjoy what she has to say.


When it comes to selecting photos for her layouts, Laura uses the following process:

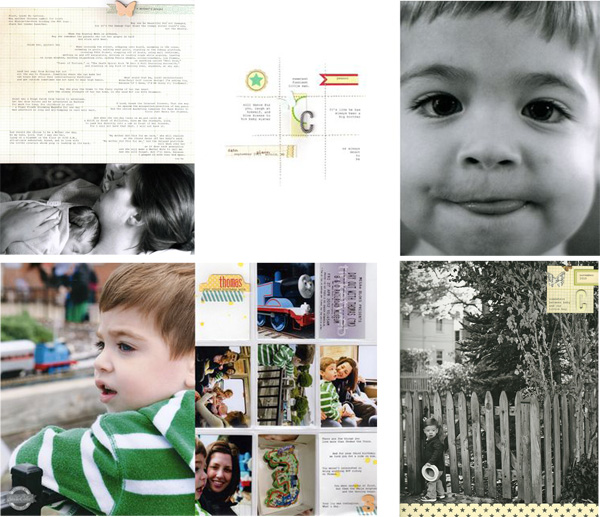
"About every 2-3 months, I upload my photos that I want to print to Persnickety Prints (usually between 100-200). Not all of these will make it on to a layout, but all will make it into my albums. I have every picture printed in wallet-size, and then I choose some to have larger prints made. The ones I choose to print larger and use on layouts are usually just the pictures I  simply like best. I am not much of an "event" scrapbooker, more of a moment scrapbooker. I also have a professional photographer come and take our family photos once a year and I rely on those a lot for my albums. I use my blog posts a lot for journaling, so I will often try to figure out which photo goes best with the writing and have those enlarged. For pictures that I don't use on layouts, I put them in baseball card holders just with tags to say what month it is and maybe a typed-out caption. (See below). I feel like these photos cover more of the "day-to-day."
Laura most commonly orders prints and scrapbooks them in a standard letter size, 8.5x11, but she says that "lately I've also been having a lot of 6x9 printed as well, so there will be pages with those coming up in the near future!"

You can definitely see Laura's love of large focal point photos -- her pages often feature one large photo on one half of a two-page spread, with patterned papers, elements, and journaling on the other page. She also uses her photographs as the "background" of her layouts, adding paper strips, tags, and journaling right on top.

Those same characteristics carry over from Laura's pages to the walls of her home as well. Laura says, "I am a huge fan of grouping big photos together in my house. Actually, I'm a big fan of photo (and artwork) groupings in general. I think with my layouts and using the large photos, I go for a visual impact, and I do the same thing with my decorating."

Thanks, Laura, for giving us this glimpse into your photos and your process.

Until next week, keep the mojo flowin'!


August 11, 2012

[Weekly Mojo Series] Take Twelve

There are lots of great photography challenges floating around the internet. Some ask you to take a photo a day, others give you a theme for the month. Still others have you focus on capturing one photo of your family each month. The one I'm playing along with is Take 12 (I'm particularly drawn to the idea of 12 photos in 12 months during the year 2012. Nice, huh?)

Here's how it works: You take 12 photos on the 12 day of each month. That's it. That's the only rule, and even that rule is flexible. (For example, one month I was sick on the 12th and never crawled out of bed that day, so my photos were actually taken on the 13th and 14th. But that's okay. They still worked out perfectly.)

I've got a great post on my blog that shares my Take 12 layouts, as well as links to a variety of products that can help you implement this easy photography project.

And for those of you doing Project Life, Take 12 can work wonderfully with that project too. Here are some great ideas for using 6x12 inserts to fit your Take 12 photos into your regular albums.

Allison chose clean black frames and black text to create a really modern streamlined addition to her album. Nichol opted for a paper-scrapped version, with strips of photos that alternate with border stamps, washi tape, and flair.

Katrina's insert is a simple insert that she pulls directly from her blog each month (and her blog posts are another great option -- this doesn't have to be a project that you stick in an album). Finally, Catherine at DesignEditor shares a great template with you on her blog.

So what are you waiting for? Tomorrow is the 12th, so get your camera ready. I'll be sharing my pics on Instagram using the hashtag #take12. I hope you'll join me.

Until then, keep the mojo flowin'!

August 5, 2012

Backpack Lovin


Do you have little ones hitting the books soon? 
 My youngest son, Ryder, will be in the first grade! 
Ryder has been my little sidekick. My baby!
I'm going to miss him so much.

School can be a challenge for kids. Life lessons aren't always fun. Hopefully, the new PP 2012 Backpack Love Notes will help brighten someone's day.
 Slip a love note in a backpack, or lunchbox & remind them they are loved! 
Don't forget the teachers, they need to be recognized too!
 ***
  Don't have kids in school? 
No worries... these note cards are versatile.  Print one out for a friend, spouse, or neighbor. Leave them around the house, under pillows, in drawers.. there is never enough love to give!


In this collection, we have {7} 3x4 cards and {3} 4x4 cards.

These work great with Project Life too! 
Have you seen the new PL Design I & J series? 4x4 pockets, baby!
My order just arrived and I can't wait to use them.


We love to give back to our community and our customers.

This 10 pack is available for Free Download.
Packaged individually, .jpg format & designed with a .25" bleed.
Print them at home. For best quality, upload to Persnickety Prints.

Ready to place an online print order? Any order over $50 qualifies for a free printed set!


Xoxo,
Chari


August 3, 2012

[Weekly Mojo Series] Tutorial: Cutout Text

Here in the South, we're finishing up our final vacations of the summer season and getting ready to head back to school. As you get your vacation prints ordered, here's another great idea to put panoramic or landscape photos to use in your home decor.

I really love the look of these canvas projects; Amy Lou offers an awesome tutorial for creating a text-based home decor project on her blog. However, you can also duplicate the look with digital papers and a photo-editing program like Photoshop Elements. Here's how to make it work in just a few easy steps:

Step 1: Open up a 12x12 canvas in your program. Resize a photo to 12x12 on this canvas and then place a painted digital paper on top of it (I used a paper from my Be You digital kit.)

Step 2: Choose a bulky font (I used Lemondrop) and type your message on a new layer. I used a quote from one of my favorite books -- it's one that always reminds me of the beautiful colors of fall.

Step 3: Use the Magic Wand Tool to select one of the letters in your text. Right click and select "similar." This will select the rest of the text.


Step 4:  With the text still selected, make sure your painted paper layer is the active layer. Choose "Delete" on your keyboard. This will delete the spaces underneath your alpha layer, creating a cutout text look. Follow up by deleting the entire text layer.

            
I finished up my project by adding a couple of extra pictures in dimensional photo frames, but you can just as easily order 12x12 prints of the plain image.

Make sure you check out our printing options in a variety of sizes. 
Until next week, keep the mojo flowin'!